As I previously explained, you have a choice to pre-wash or not pre-wash your fabric, but I am recommending that regardless of which you choose, you iron your fabric before you start to mark and cut up your squares. Any way manufacturers fold fabric will leave at the very least a semi-centered crease or fold lines. For a larger piece of fabric it is important to be able to accurately fold fabric in half. In the picture below I took a large towel and folded it in thirds to create a makeshift ironing board on my kitchen table.
In this case we need to line up and straighten your cutting line before you begin. Hold both selvage edges of your fabric up in front of you letting the rest hang down. Now move the edge of the selvage that is toward you left or right until the folded edge does not 'wrinkle' at the fold. Now set fabric on your cutting surface. As you can see below, the selvages are lined up but the cut ends do not.
Now this is where the two methods differ. The first is using a straight ruler and isn't quite as accurate as a quilter's square ruler but for many years it did the job quite well for me. So here is how I did it. Your goal is to cut to the left of the ragged edges to make a clean straight line.
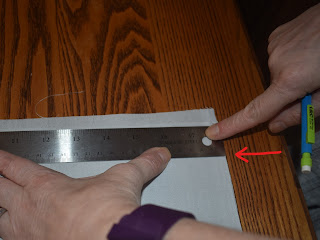
STRAIGHT RULER METHOD: Line the end of your ruler on the selvage.
Now draw a line down the length of your ruler.
Moving the ruler up about 6 or 7 inches along the line you just made, continue drawing the line until it continues the complete width of the folded fabric.
This is the cutting line for your scissors. Once finished this cut edge will be a straight edge to measure from.
You are now be ready to mark your fabric at the 4 1/2 inch intervals from the edge of the fabric you just squared up and cut. Mark and cut one row at a time. Make several of these marks along the cut edge and connect them in a cutting line.
Your goal is to cut on this line making a 4 1/2 inch strip. Do not unfold this strip. You will be continuing to cut through two layers.
Make two marks 1/2 inch from your selvage edge. Connect the line and cut off. The selvage is slightly different than the rest of your fabric. It's made to keep the edges from unraveling and sometimes it is marked by the manufacturers with color dots that match all the colors used in a print fabric and usually the name of the fabric line so it's a good idea to cut this part off.
You will now start the process of marking and lining every 4 1/2 inches to cut your squares.
Don't forget to mark and line your quarter inch seam allowances from the last lesson.
ROTARY CUTTER METHOD: Line up the end of your Quilter's ruler along the edge of the selvage.
SAFETY FIRST Never set down your rotary cutter without it's safety cover over the blade. Make a conscious effort to make this a habit. This is especially important if you have little hands around your house (and for your own hands). Never use a rotary cutter on anything but a rotary cutting mat. I have also found that along with a firm hand on the ruler, a pinkie on fabric and edge of ruler will help keep the ruler from sliding while your rotary cutter is cutting along it's other side. And last but not least, always be aware of where your fingers are at. Rotary cutter blades are extremely sharp! I think you will find that most of the tips I put in these posts is because I've learned from experience what NOT to do. I'm hoping to spare you the results of my folly. You may thank me later. :)
Put the edge of the rotary cutter blade slightly in front of the selvage edge and press down cutting into the fabric, then roll the blade toward you using a slight rocking motion just a little bit to cut the edge. This will keep the blade from pushing the edge of fabric slightly ahead as you start the cut. Except for this one instance, never cut fabric with a rotary cutter towards you. Always away.
From this first cut line you will measure your next cut so carefully folding fabric on top of cutting mat, turn the cutting mat 360 degrees. This helps keep your fabric from becoming unaligned.
Starting from your cut edge, place ruler on the 4 1/2 inch mark along the entire ruler.
Using the same method to start cutting make a 4 1/2 inch wide strip.
Again place your ruler to cut 1/2 of the selvage off then starting from the cut line, place your ruler edge again at the 4 1/2 inch mark and cut your first set of squares. Continue until you have cut the entire strip.
Don't forget to mark your quarter inch seam allowances on the wrong side of all of your squares.
Regardless of which method you used, you should now have squares that look like this.
Next week we'll be ironing and sandwiching your block to quilt.
[Note: I wanted to thank my daughter, Erin, who helped me by taking the pictures for me this week. I would also like to apologize for a few of the pictures that are slightly dark or blurry. Erin did a fabulous job but I should have checked the light level. For our purposes, they should be fine. They are definitely better than my attempt with the first week so I am confident they will keep getting better! Also it's been recommended to me that I need a glossary of some sort which I will endeavor to create for future reference.]


No comments:
Post a Comment